First
let me apologize for being a little late with this installment.
We have been busy with other projects here at Blue Moon,
one of which is a calendar of Blue Moon bikes and Vortex
waitresses. Here's a small taste.
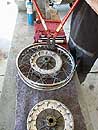 Today we will build a set of wheels with new
chrome rims and spokes. The first thing after removing
the tire is to cut the old spokes out of the rim, this
can best be accomplished with a
bolt cutter. There is no
point in saving the old spokes and nipples, cut them
up and toss em. Do be sure to save the square brass spoke
plates as these are expensive and reusable. Chrome shops
charge over $200 per wheel to
plate a rim, you will
save money by simply replacing your rims. Aluminum rims
can be polished if they are not heavily pitted, be sure
your rim is straight before e you send it out for
polishing.
Today we will build a set of wheels with new
chrome rims and spokes. The first thing after removing
the tire is to cut the old spokes out of the rim, this
can best be accomplished with a
bolt cutter. There is no
point in saving the old spokes and nipples, cut them
up and toss em. Do be sure to save the square brass spoke
plates as these are expensive and reusable. Chrome shops
charge over $200 per wheel to
plate a rim, you will
save money by simply replacing your rims. Aluminum rims
can be polished if they are not heavily pitted, be sure
your rim is straight before e you send it out for
polishing. |
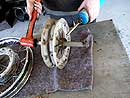 Follow the shop manual to inspect your wheel
bearings,you can use your axle and a home made pipe
spacer to hold the bearings in alignment while tapping
them out. Always use heat when
removing wheel bearings.
After cleaning, inspect the bearing races for small
pits or rust,replace any questionable bearing, pack
them with a good quality wheel bearing grease.
Follow the shop manual to inspect your wheel
bearings,you can use your axle and a home made pipe
spacer to hold the bearings in alignment while tapping
them out. Always use heat when
removing wheel bearings.
After cleaning, inspect the bearing races for small
pits or rust,replace any questionable bearing, pack
them with a good quality wheel bearing grease. |
 If a bearing is replaced the assembly will
have to be re-shimmed, you want minimal free play with
no binding when the axle nut is torqued. Test the bearing
fit before the bearings are
installed in the wheel.
You really don't need a full set of bearing shims to
do this job but you will need a lathe to cut the spacer
to size.
If a bearing is replaced the assembly will
have to be re-shimmed, you want minimal free play with
no binding when the axle nut is torqued. Test the bearing
fit before the bearings are
installed in the wheel.
You really don't need a full set of bearing shims to
do this job but you will need a lathe to cut the spacer
to size. |
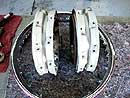 We have given our wheel hubs the bead blast
treatment and they are now ready for the bearings
to be installed, along with new seals, Some times
I clear coat the freshly blasted hubs
with urethane clear. The hubs
will stay cleaner and not oxidize but the look will
be somewhat different from original.
We have given our wheel hubs the bead blast
treatment and they are now ready for the bearings
to be installed, along with new seals, Some times
I clear coat the freshly blasted hubs
with urethane clear. The hubs
will stay cleaner and not oxidize but the look will
be somewhat different from original. |
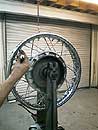
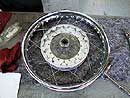 There's a myth about wheel lacing being a "magic" science and
a lost art. Its really quite simple, the BMW wheel
hub directs the spokes for you,the wheel will only
go together one way. If this is your first
wheel
lacing experience do just one wheel at a time so you
always have an assembled wheel to refer to. It is important
to note that these rims have a left side and a right
side, basically you must
put an inside spoke to an inside
nipple and and outside spoke to an outside nipple.If
the spokes interfere with each other where they cross
try flipping the rim over.
There's a myth about wheel lacing being a "magic" science and
a lost art. Its really quite simple, the BMW wheel
hub directs the spokes for you,the wheel will only
go together one way. If this is your first
wheel
lacing experience do just one wheel at a time so you
always have an assembled wheel to refer to. It is important
to note that these rims have a left side and a right
side, basically you must
put an inside spoke to an inside
nipple and and outside spoke to an outside nipple.If
the spokes interfere with each other where they cross
try flipping the rim over.
BMW spokes use a 4mm nipple, some after market spokes, such as Buchanan's use
a 5mm nipple, these larger nipples can present a problem when trying to lace them to a stock rim. I suggest you
get your rims and your spokes from the same source.
Its a good idea to use anti seize compound on the spoke threads,especially if
you are using stainless spokes. Personally I prefer chrome plated spokes as they are brighter and moreauthentic. |
 After the wheel is laced and all spokes are
finger tight it is time to start the lacing process.
First you want to note the rim offset. You can measure
this on your other wheel that
you haven't dissembled, its the
sideways distance from the edge of the rim to the edge
of the brake drum use a straight edge a ruler to
determine the off set. Now begin snugging the spokes
using a proper spoke wrench. You
want do do each spoke about a quarter
turn at a time ,always adjusting for the "run out" and the "side to side" distance.
A little practice and you will get the hang of it.
Continue this process until all the spokes are tight
and the rim spins true. You can tap on
each spoke with the wrench to hear if they ring.A dead
sound is a loose spoke.
After the wheel is laced and all spokes are
finger tight it is time to start the lacing process.
First you want to note the rim offset. You can measure
this on your other wheel that
you haven't dissembled, its the
sideways distance from the edge of the rim to the edge
of the brake drum use a straight edge a ruler to
determine the off set. Now begin snugging the spokes
using a proper spoke wrench. You
want do do each spoke about a quarter
turn at a time ,always adjusting for the "run out" and the "side to side" distance.
A little practice and you will get the hang of it.
Continue this process until all the spokes are tight
and the rim spins true. You can tap on
each spoke with the wrench to hear if they ring.A dead
sound is a loose spoke.
By the way you don't need a fancy truing stand, the earls fork swing arm will
make a fine stand. It is not difficult to lace and true BMW wheels,anyone can do it with a little patience and
practice.
|
 Use
the special wheel nut pin wrench when tightening or loosening the wheel
nuts it will save
your nuts from damage. I always replace the hub caps
with new ones, these are relatively inexpensive
and they look
great. Use
the special wheel nut pin wrench when tightening or loosening the wheel
nuts it will save
your nuts from damage. I always replace the hub caps
with new ones, these are relatively inexpensive
and they look
great.
Of course I should tell you Blue Moon Cycle sells the parts and tools required
to build your wheels right.Or put your crusty wheels in a box and send them to us,in a few days they will
come back looking like new. |
Next week in episode 6:
Stay tuned for our next virtual restoration episode, we are ready to start assembling the chassis.
Click
here to turn to Virtual Restoration. |