 Today
we will be removing the crankshaft and camshaft
front the R60/2 engine block. We will start will
Ed Korn's Many in One Tool, this tool provides
a way to pull the timing gears, gear covers and
main bearings, as you will see. Price of
the tool is about $250. Today
we will be removing the crankshaft and camshaft
front the R60/2 engine block. We will start will
Ed Korn's Many in One Tool, this tool provides
a way to pull the timing gears, gear covers and
main bearings, as you will see. Price of
the tool is about $250.
|
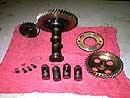 First
we remove the camshaft with the cam gear attached,
we also inspect the lifters and oil pump gear.
It is common for the lifters to have small pits
on their face where they contact he cam lobe. If
the lifters are pitted of cracked they should be
replaced. Also check side play of the lifter in
its bore, if you can wiggle them side to side you
must rebush the lifter bore. This engine had four
perfect lifters so we won't need to replace any
parts here. Also check the timing gear teeth for
pits or unusual wear. These gears are in matched
sets and individually sized to each block, do not
mix and match timing gears, if they are bad you
will have to replace them as a set and its expensive!
We are happy to see that this set is fine. First
we remove the camshaft with the cam gear attached,
we also inspect the lifters and oil pump gear.
It is common for the lifters to have small pits
on their face where they contact he cam lobe. If
the lifters are pitted of cracked they should be
replaced. Also check side play of the lifter in
its bore, if you can wiggle them side to side you
must rebush the lifter bore. This engine had four
perfect lifters so we won't need to replace any
parts here. Also check the timing gear teeth for
pits or unusual wear. These gears are in matched
sets and individually sized to each block, do not
mix and match timing gears, if they are bad you
will have to replace them as a set and its expensive!
We are happy to see that this set is fine.
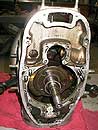
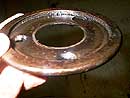
The
round slotted disc is the crank case breather valve,
as it rotates it opens a passage to allow the crank
case gasses to escape, this allows the engine to
maintain optimum crankcase pressure as the pistons
move up and down in their bore.
The face of the
breather valve must be smooth to insure a good seal, this part seldom wears out |
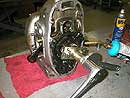 Now
we use our puller tool to remove the crank shaft
timing gear from the crank.This gear is a tight
press fit so it helps if you heat the gear with
a propane torch to 220 degrees, hot enough
to fry spit but not so hot as to damage the temper
of the steel. Now
we use our puller tool to remove the crank shaft
timing gear from the crank.This gear is a tight
press fit so it helps if you heat the gear with
a propane torch to 220 degrees, hot enough
to fry spit but not so hot as to damage the temper
of the steel. |
 The
front bearing support has been removed after we
pulled the timing gear. Next remove the two slinger
ring screws and take out the slinger ring. Heat
the rear bearing support and lightly tap the crank
forward from the rear, the rear main bearing
and crank will slide forward and hang loose in
the block. Now rotate the crank until the front crank
web is facing upward. Now lift up on
the front of the crank and pull the crank out of
the case. This is a real jig-saw puzzle but it
goes easy. It's hard to imagine how they designed
this on paper before the advent of computers. The
Germans were pretty smart! The
front bearing support has been removed after we
pulled the timing gear. Next remove the two slinger
ring screws and take out the slinger ring. Heat
the rear bearing support and lightly tap the crank
forward from the rear, the rear main bearing
and crank will slide forward and hang loose in
the block. Now rotate the crank until the front crank
web is facing upward. Now lift up on
the front of the crank and pull the crank out of
the case. This is a real jig-saw puzzle but it
goes easy. It's hard to imagine how they designed
this on paper before the advent of computers. The
Germans were pretty smart! |
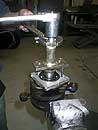 When
the Crank is removed you are ready to pull the
rear main bearing, again we use Ed's many in one
tool, first heat the bearing as you don't want
to remove any material from the crank journal.
We always replace the main bearings, these parts
are relatively inexpensive and the do sometimes
fail. Do not just use any bearing from you local
bearing supply, while all replacement bearings
are the same size, they are all not the same.They
have differing types of ball cages and they are
made to differing degrees of precision. Buy your
main bearings from a reputable source with
BMW motorcycle experience, or by genuine BMW parts. When
the Crank is removed you are ready to pull the
rear main bearing, again we use Ed's many in one
tool, first heat the bearing as you don't want
to remove any material from the crank journal.
We always replace the main bearings, these parts
are relatively inexpensive and the do sometimes
fail. Do not just use any bearing from you local
bearing supply, while all replacement bearings
are the same size, they are all not the same.They
have differing types of ball cages and they are
made to differing degrees of precision. Buy your
main bearings from a reputable source with
BMW motorcycle experience, or by genuine BMW parts. |
 We
promised Adam we would take a picture of him
with his "crank in hand". Here he is! We
promised Adam we would take a picture of him
with his "crank in hand". Here he is!
If the connecting
rods have more than .0004 inch axial play they will have to be rebuilt with new
bearings. Blue Moon provides rebuilt crank shafts on exchange if this is the
case.
|
 Here's
a close up of one of the two slinger rings.
As you can see it is totally full of hard caked
sludge. This material is a combination of aluminum
and steel and bronze from the normal wear
and tear of the engine internal parts. Its all
packed together with carbon from the combustion
gasses and old motor oil. You can pick it out
with a sharp metal pick or you can sand
blast it out but that takes time. We will throw
ours away and replace it with a new slinger ring. Here's
a close up of one of the two slinger rings.
As you can see it is totally full of hard caked
sludge. This material is a combination of aluminum
and steel and bronze from the normal wear
and tear of the engine internal parts. Its all
packed together with carbon from the combustion
gasses and old motor oil. You can pick it out
with a sharp metal pick or you can sand
blast it out but that takes time. We will throw
ours away and replace it with a new slinger ring.
How can you tell
if your slingers are full? answer is "you can't". The only way to know
is complete disassembly of the engine You will save the cost of a crankshaft
rebuild if you catch it it time. Wait too long and the clogged passage shuts
of oil supply to the rod bearings causing an audible knock followed by a
loud knock, followed by a long walk home.
|
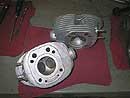 Our
cylinder heads cleaned up nicely in the bead blaster,
one of the exhaust threads is stripped so it goes
to our machinist for heliarc and rethreading. Our
cylinder heads cleaned up nicely in the bead blaster,
one of the exhaust threads is stripped so it goes
to our machinist for heliarc and rethreading. |
Next week in episode 4:
Tune
in next week,we might
rebuild the wheels or
gearbox.
Click here to
turn to Virtual Restoration. |

